
5 Outdoor Lighting Mistakes (& How to Avoid Them)

Landscape & Architectural Lighting
With so many outdoor lighting options and techniques, designing the perfect outdoor lighting system can be overwhelming. But, when done well, outdoor lighting will literally transform the exterior of your home at night. Not only will it increase curb appeal and add an extra layer of security, but it will also facilitate safe navigation throughout your property and increase the functionality of your outdoor living spaces.
Professional Outdoor Lighting vs. DIY Outdoor Lighting
For safety and aesthetic reasons, we always recommend hiring an outdoor lighting contractor to design and install your outdoor lighting system. However, we realize that many homeowners will still choose to DIY their lighting. Whatever option you choose, Limelight is here to help! If you are still deciding, we recently answered some of the most frequently asked outdoor lighting questions on our blog. We also encourage you to check out this article that compares the costs associated with different outdoor lighting options. The more you know, the easier this decision will be!
Whether you’re looking for a weekend DIY project or have already decided to hire an outdoor lighting contractor, you’ve come to the right place. Today, we are taking you through some of the most common outdoor lighting mistakes we see daily by DIYers and “professionals” alike.
Top 5 Outdoor Lighting Mistakes
1. Choosing the WRONG Fixture for the Job.
Outdoor lighting may seem like a no brainer. Buy lights, install lights, wait for dark - easy! Right? Not so much. A lot goes into the design and installation of an outdoor lighting system. Avoid the urge to buy a bunch of box store path lights and start popping them into your landscaping. Take a minute to determine your outdoor lighting objectives and choose your fixtures wisely. Or if you’re hiring a lighting contractor, determine your outdoor lighting objectives, ask for a consultation, and be sure to do your due diligence on the contractor you hire – check out their photos, website, or even ask for addresses so you can see their work in person.
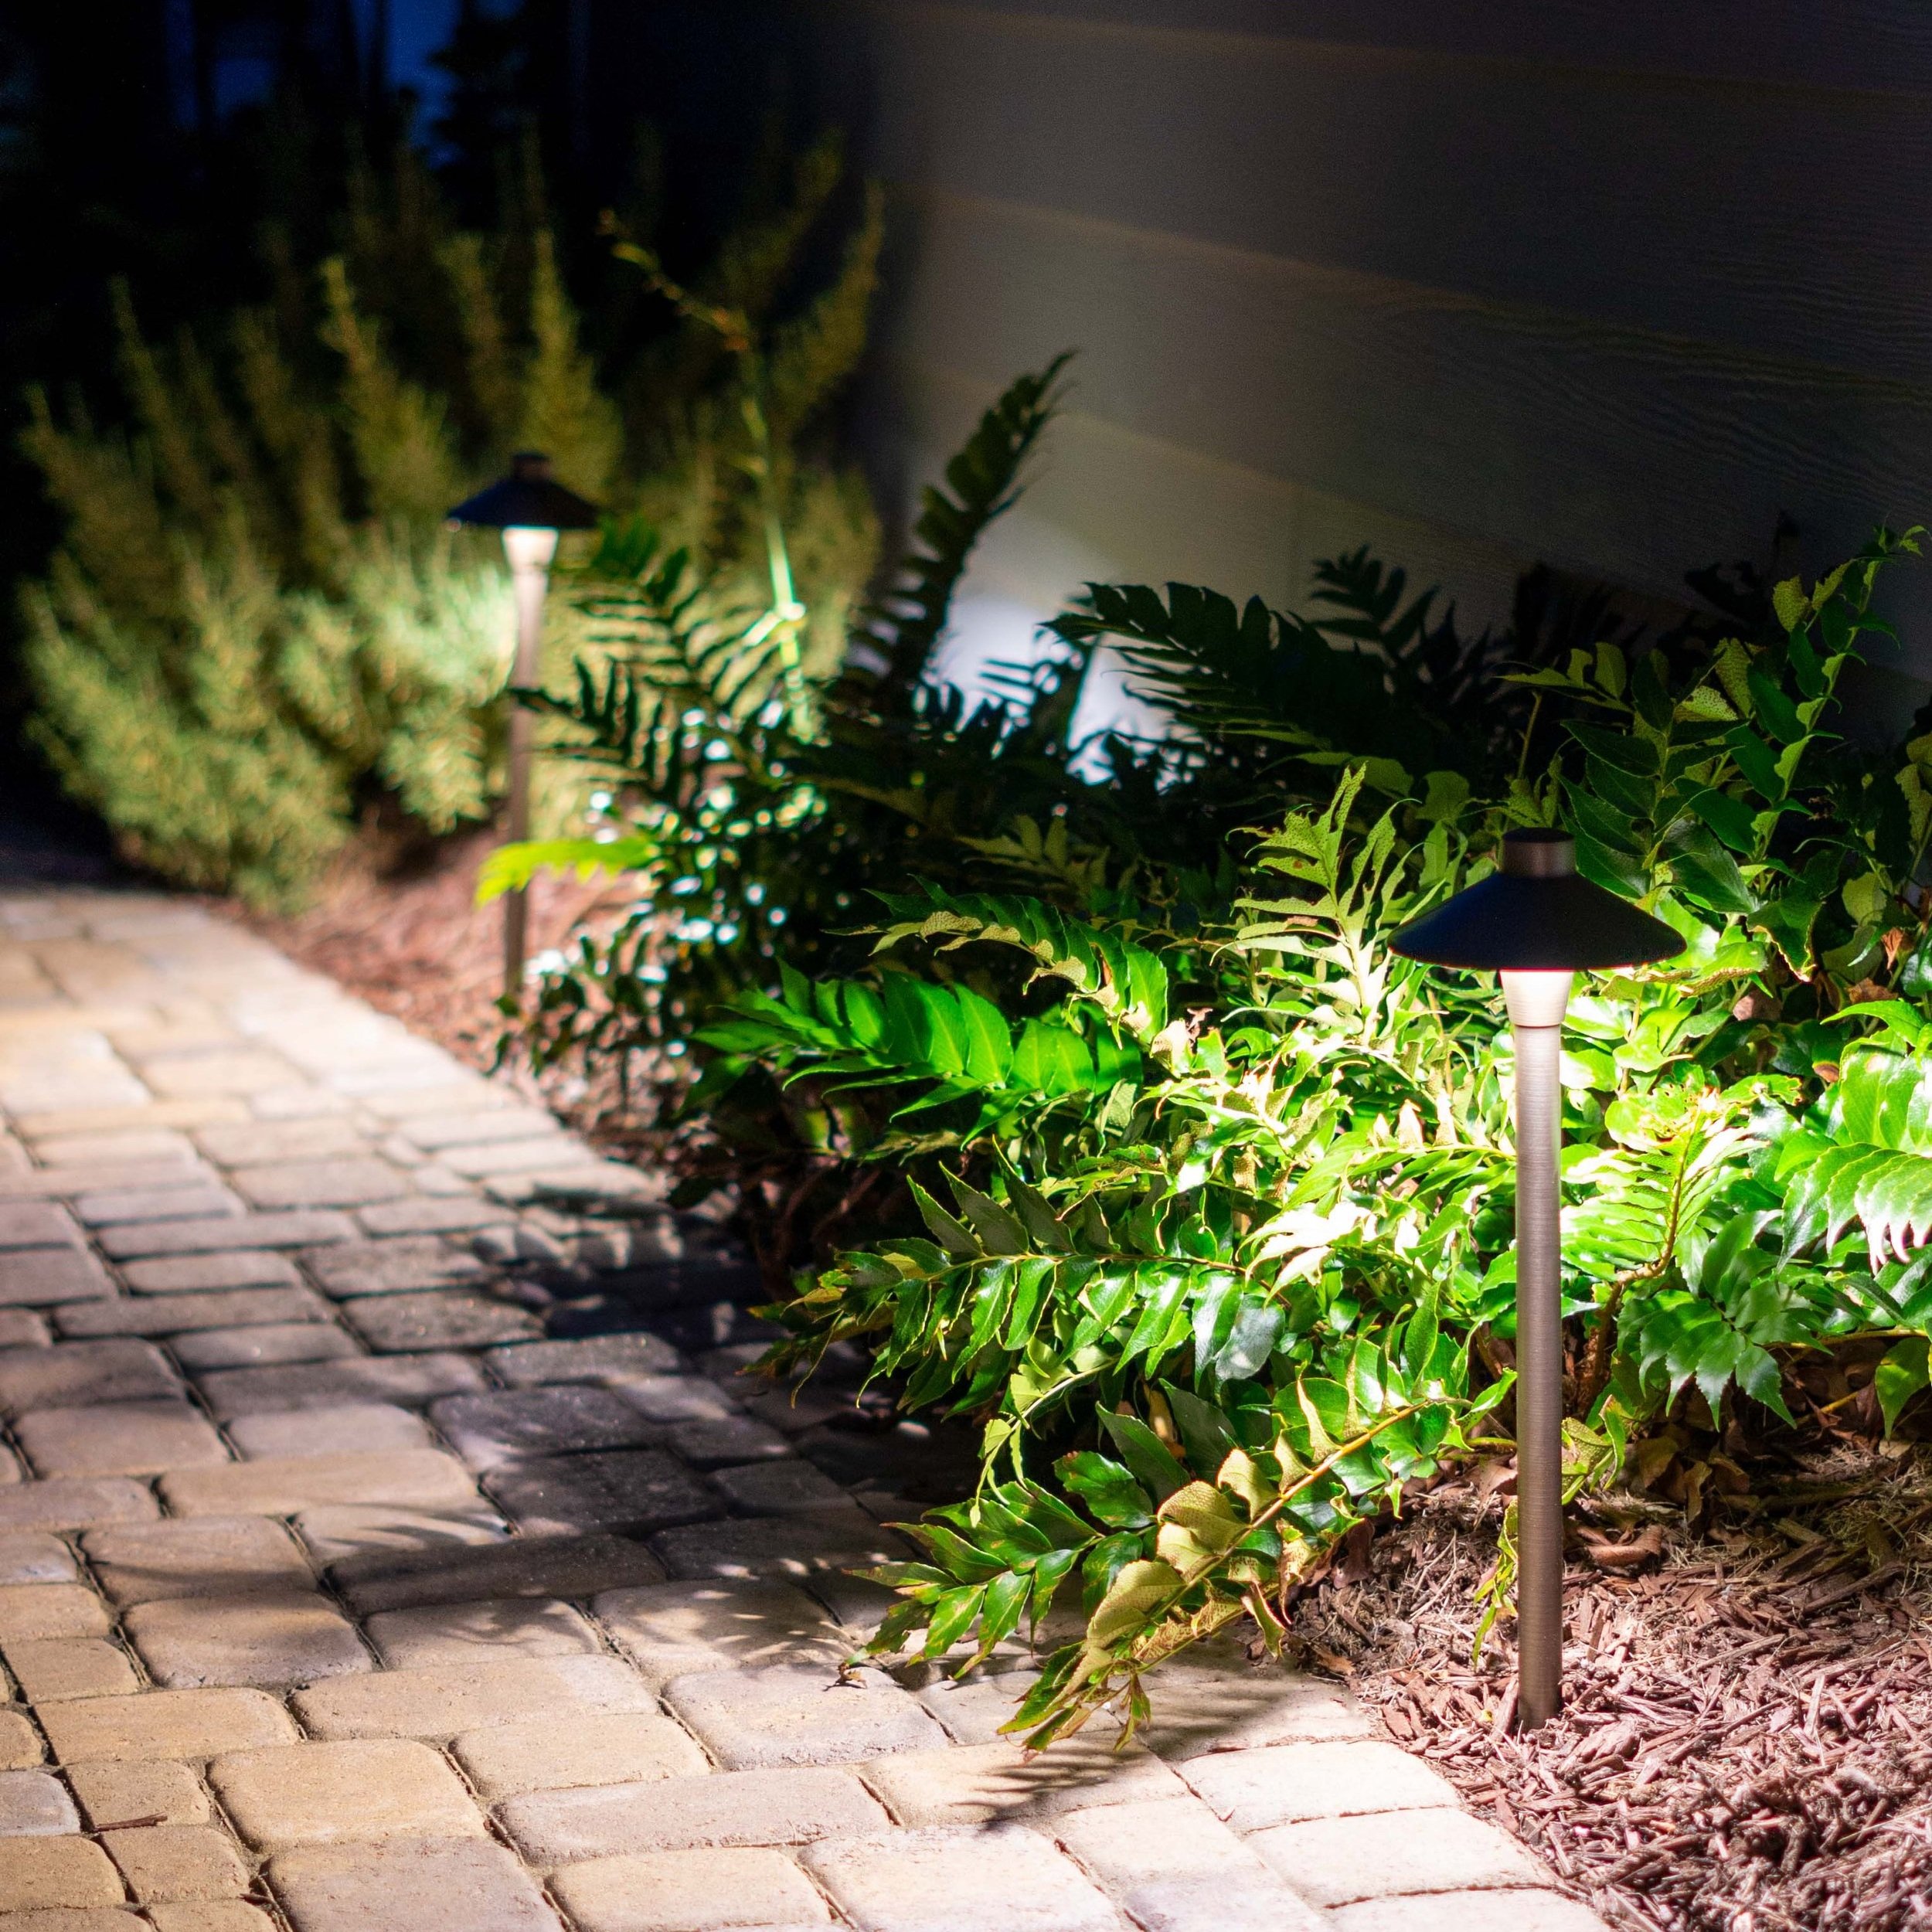
First, when selecting the type of fixtures for your lighting project, always consider the application. If you are lighting a pathway or set of stairs that are surrounded by landscaping beds, path lights will be a great option and should be spaced every 8-10 feet. But remember, path lights only provide light low to the ground. If you want to add architectural lighting to your home or accent a particularly beautiful tree, select an uplight with a higher lumen output so that the light reaches the areas you want to illuminate. Keep all of this in mind as you select your fixtures and especially as you interview your outdoor contractor. A well-trained outdoor lighting specialist will be able to give you suggestions as to which fixtures would work best for your spaces.
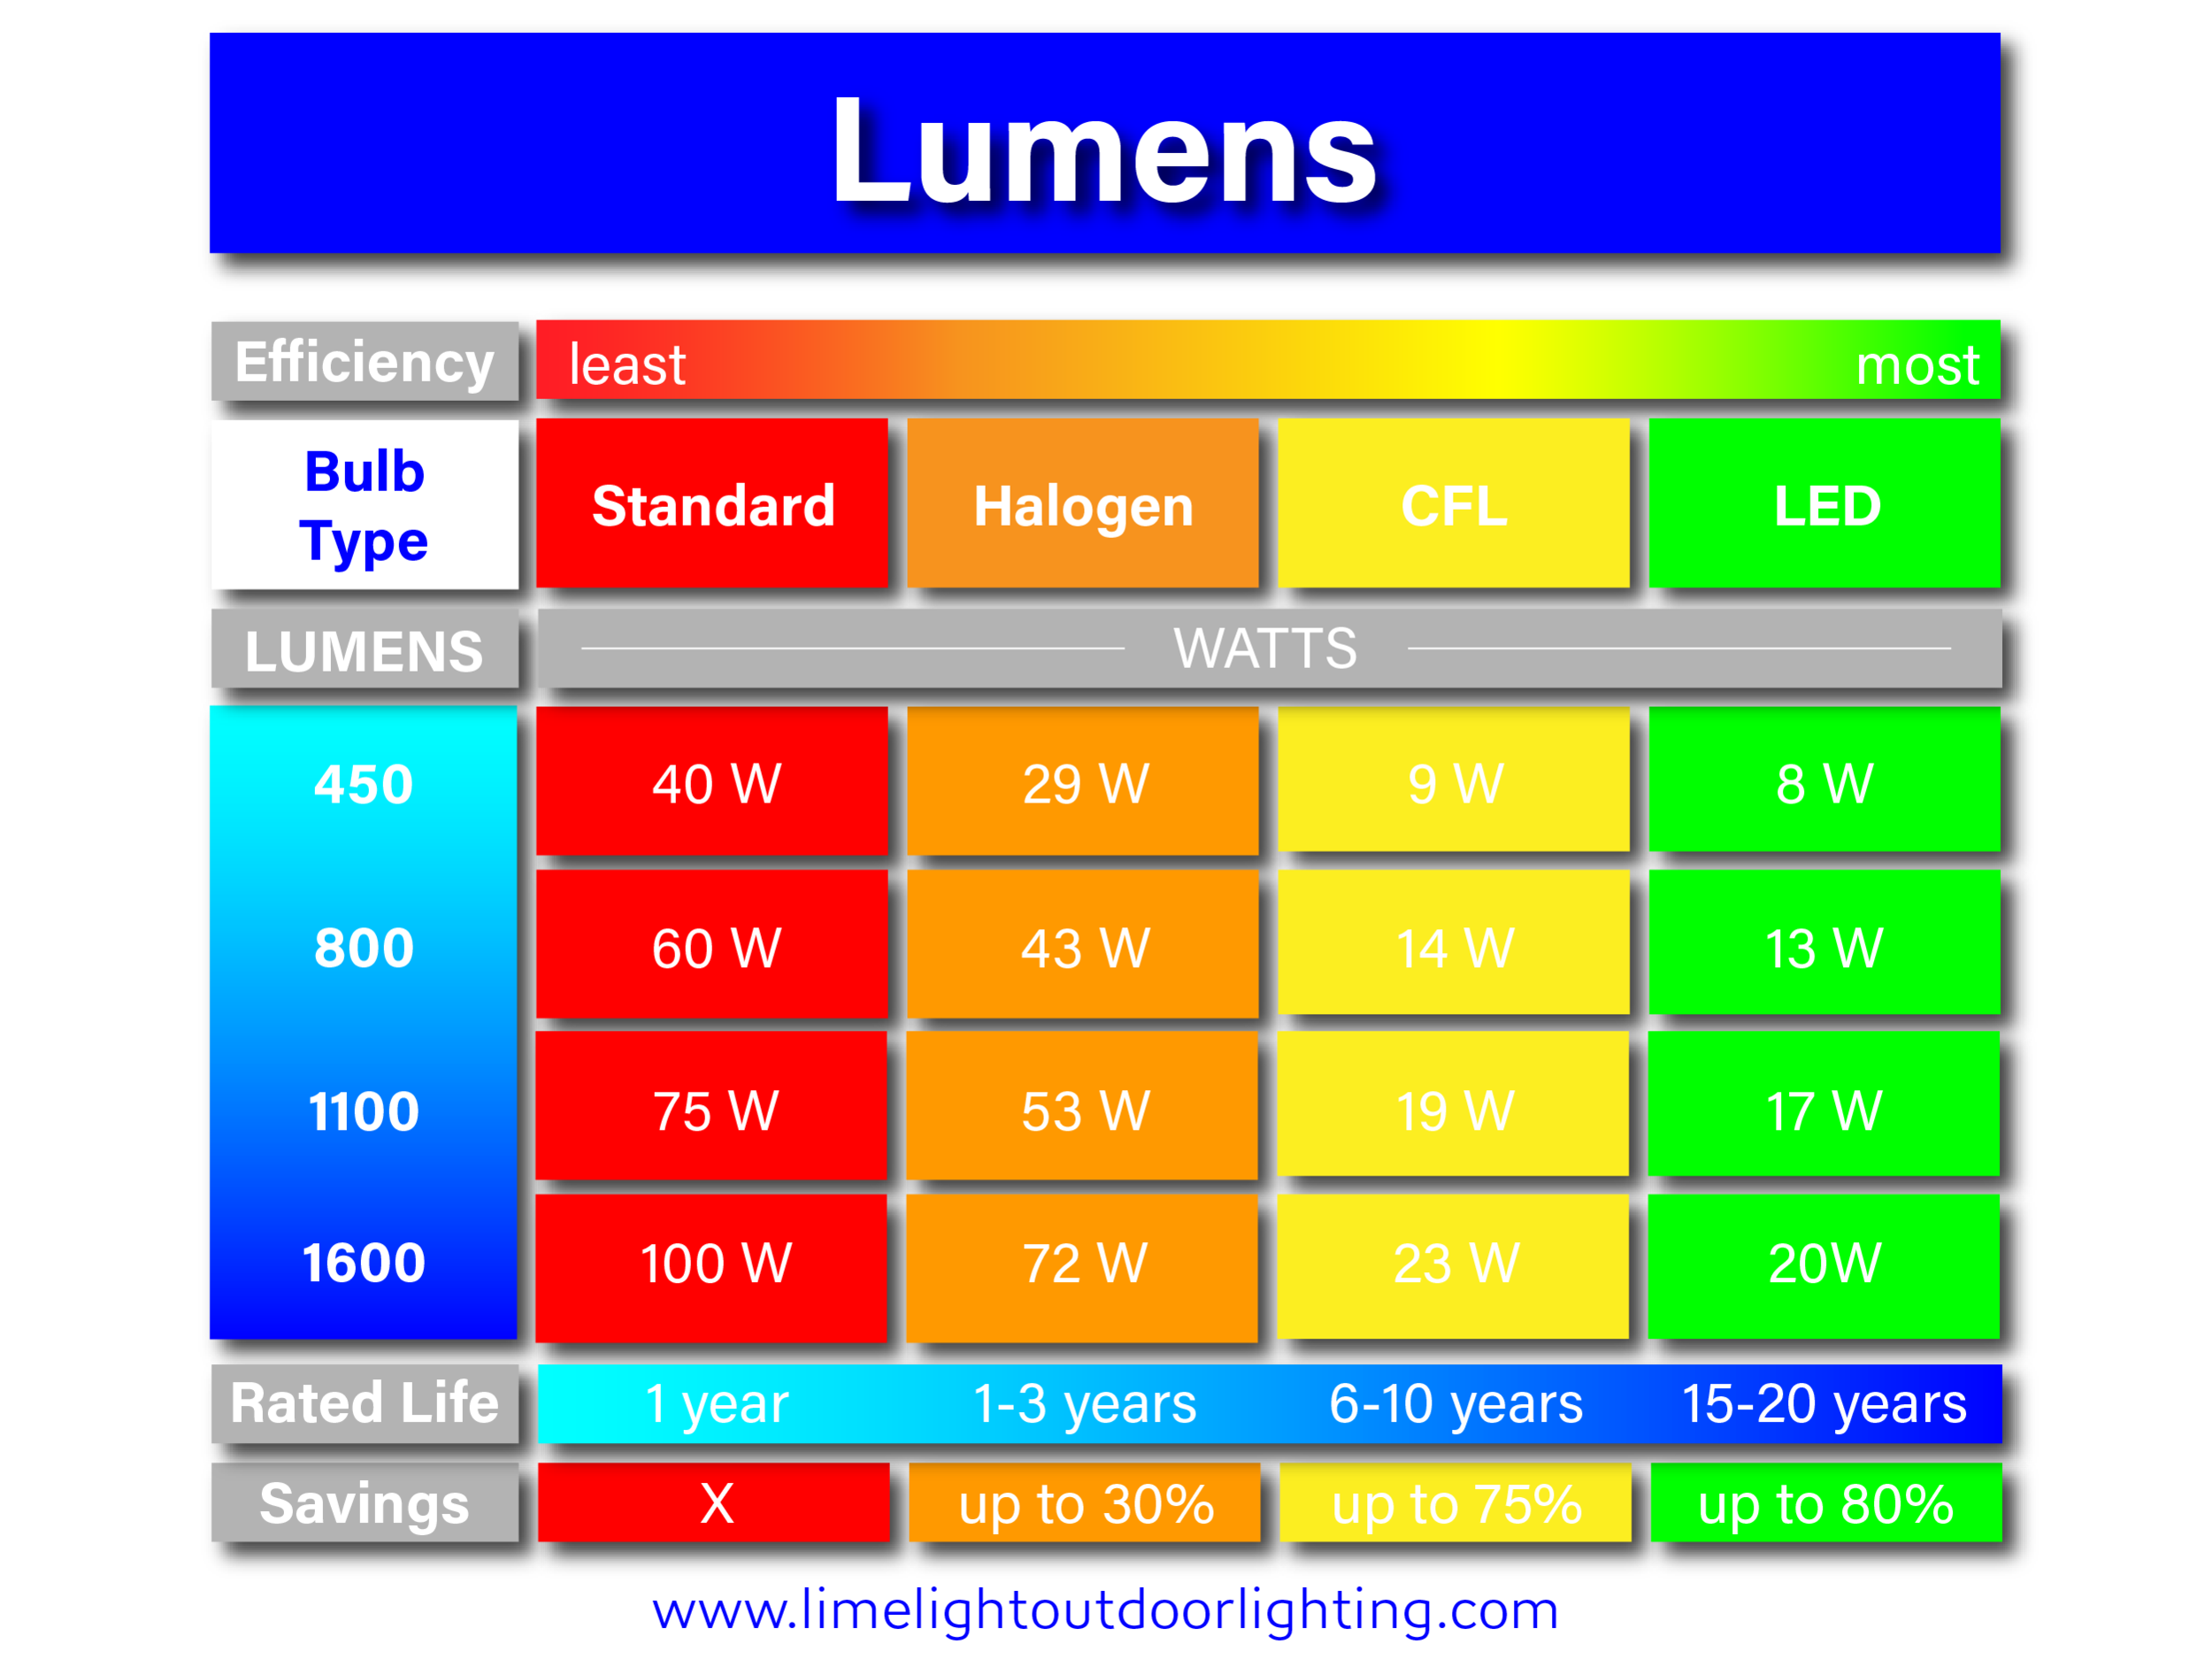
The second thing to think about when choosing your fixtures is more applicable to DIY outdoor lighting. Many DIYers use solar powered lights. While solar lights seem to be the most economical and environmentally friendly solution, consider the following: solar lights dim significantly within just a few months of use AND they are usually made with lower quality materials which means that they will need to be replaced more often. We recommend investing in a transformer and high-quality LED fixtures which use very little energy. This will ensure that your lighting system will stay bright for years to come.
2. Visible Light Sources
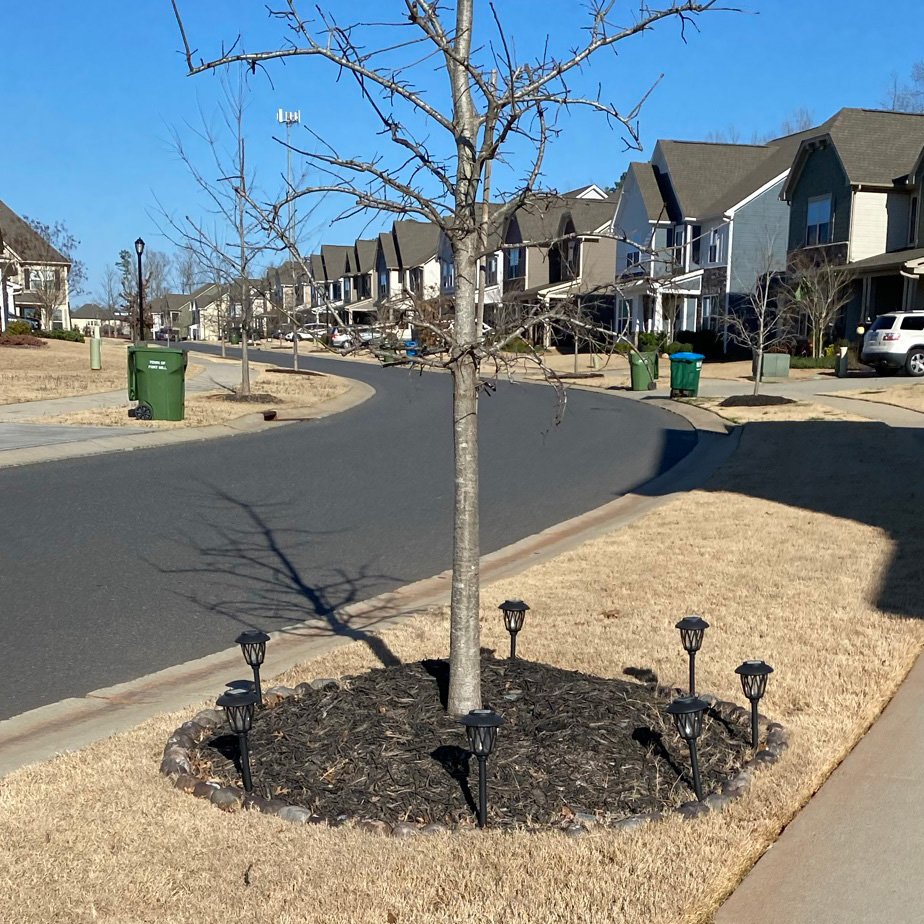
With the exception of path lights and decorative lights like bollards or sparklers, the source of light (the fixture and/or lamp) should be hidden. Even in situations where this is not possible, like with an accent light on a tree in the center of a yard, we do our best to select fixtures that blend into the surroundings. We also make sure to select fixtures with shrouds that conceal the lamp from the main viewing angle. No one wants to be blinded by an accent light when they are driving past your home. Just remember, the goal of landscape lighting is to see the illumination, not the light itself.
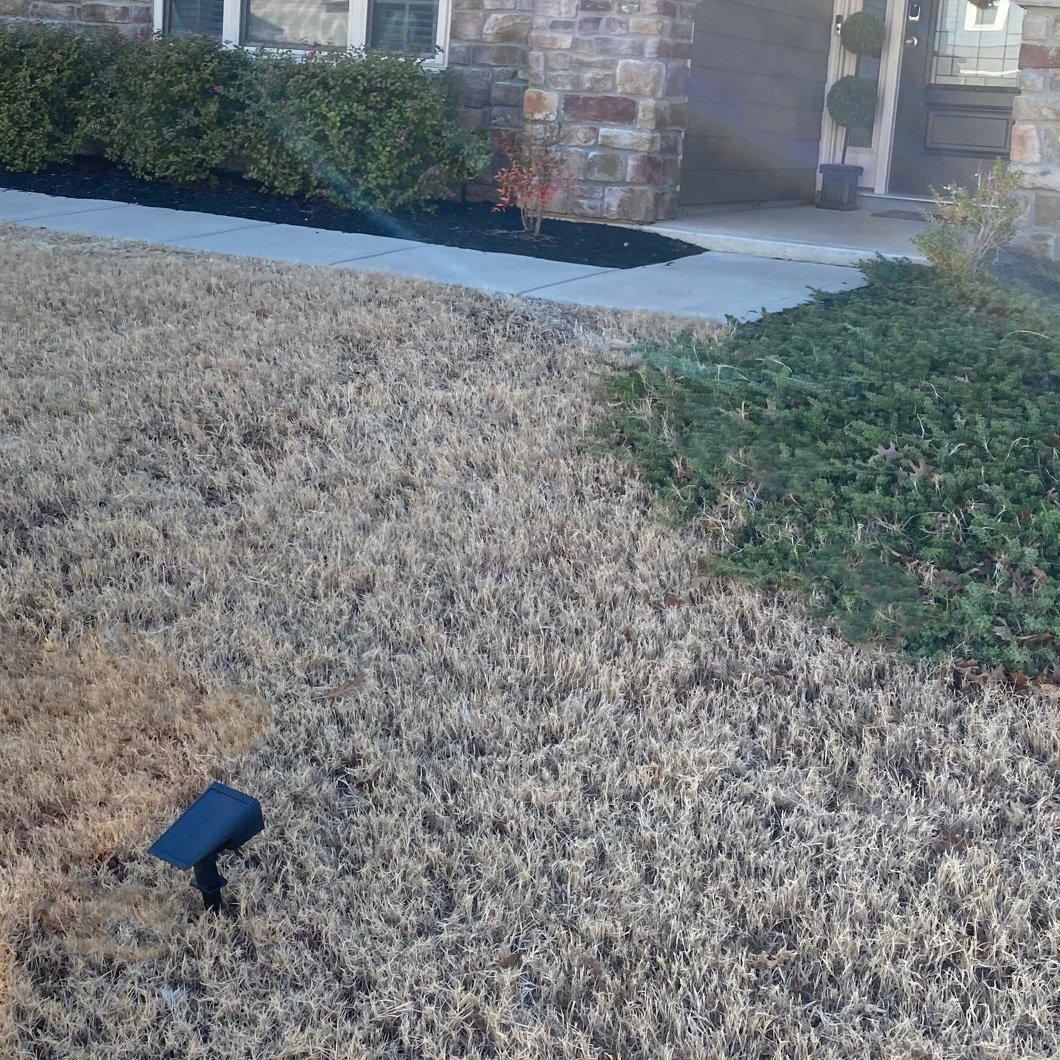
Notice in the image below, this solar powered uplight is positioned directly in the middle of the front lawn. While this light produces a decent amount of light and illuminates a large portion of the house, the fixture itself is an eyesore. Seemingly, the placement of this fixture makes sense – it is a solar light so it needs to be in an area with plenty of sun exposure. Additionally, the light is positioned further away from the house so that it will illuminate a larger portion of the home. A better solution would be to use multiple LED lights positioned closer to the home and concealed behind the bushes. While the lighting in this photo is DIY, it is not uncommon to see this mistake in professional lighting jobs as well. We oftentimes see lights positioned too far away from the structure which inevitably leads to washed out, flat lighting and unsightly shadows.

3. Ignoring Kelvin Temperature, Beam Angle, and Lumen Output
Outdoor lighting is not “one size fits all.” Professional outdoor lighting designers and DIYers alike should always consider Kelvin Temperature, Beam Angle, and Lumen Output when creating the design plan and selecting fixtures/lamps.
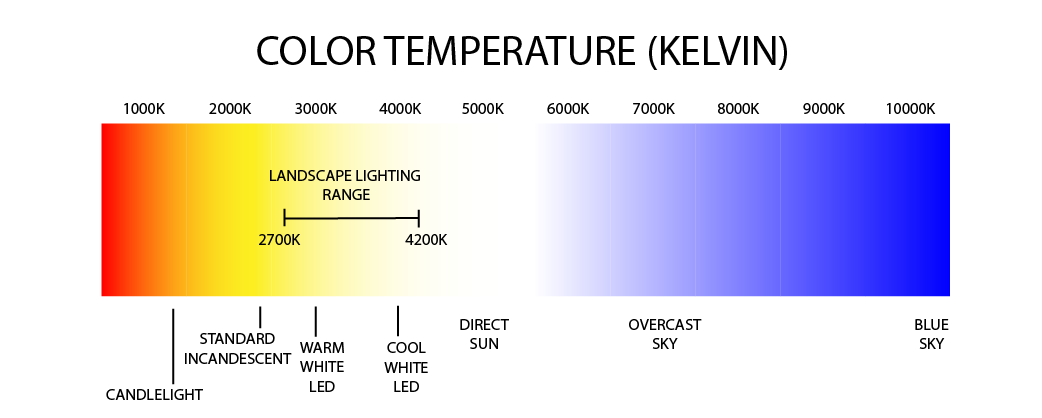
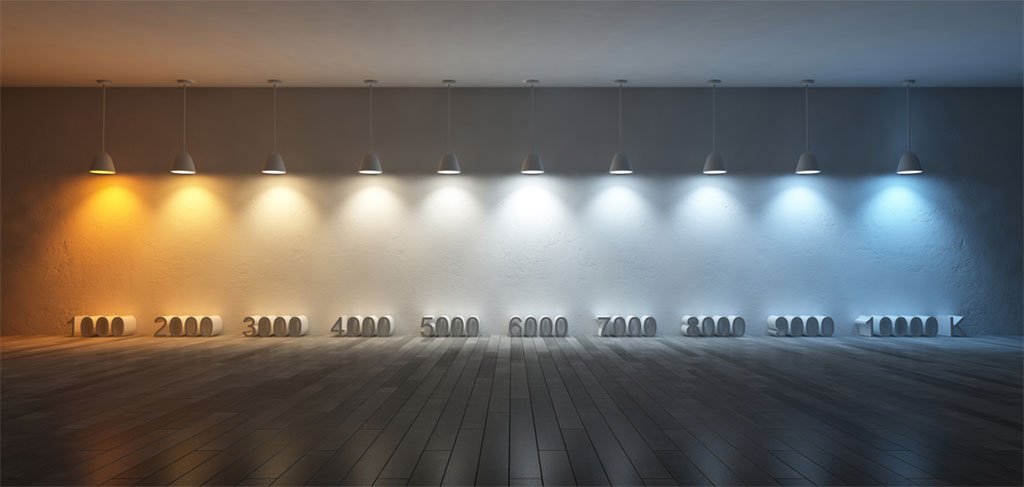
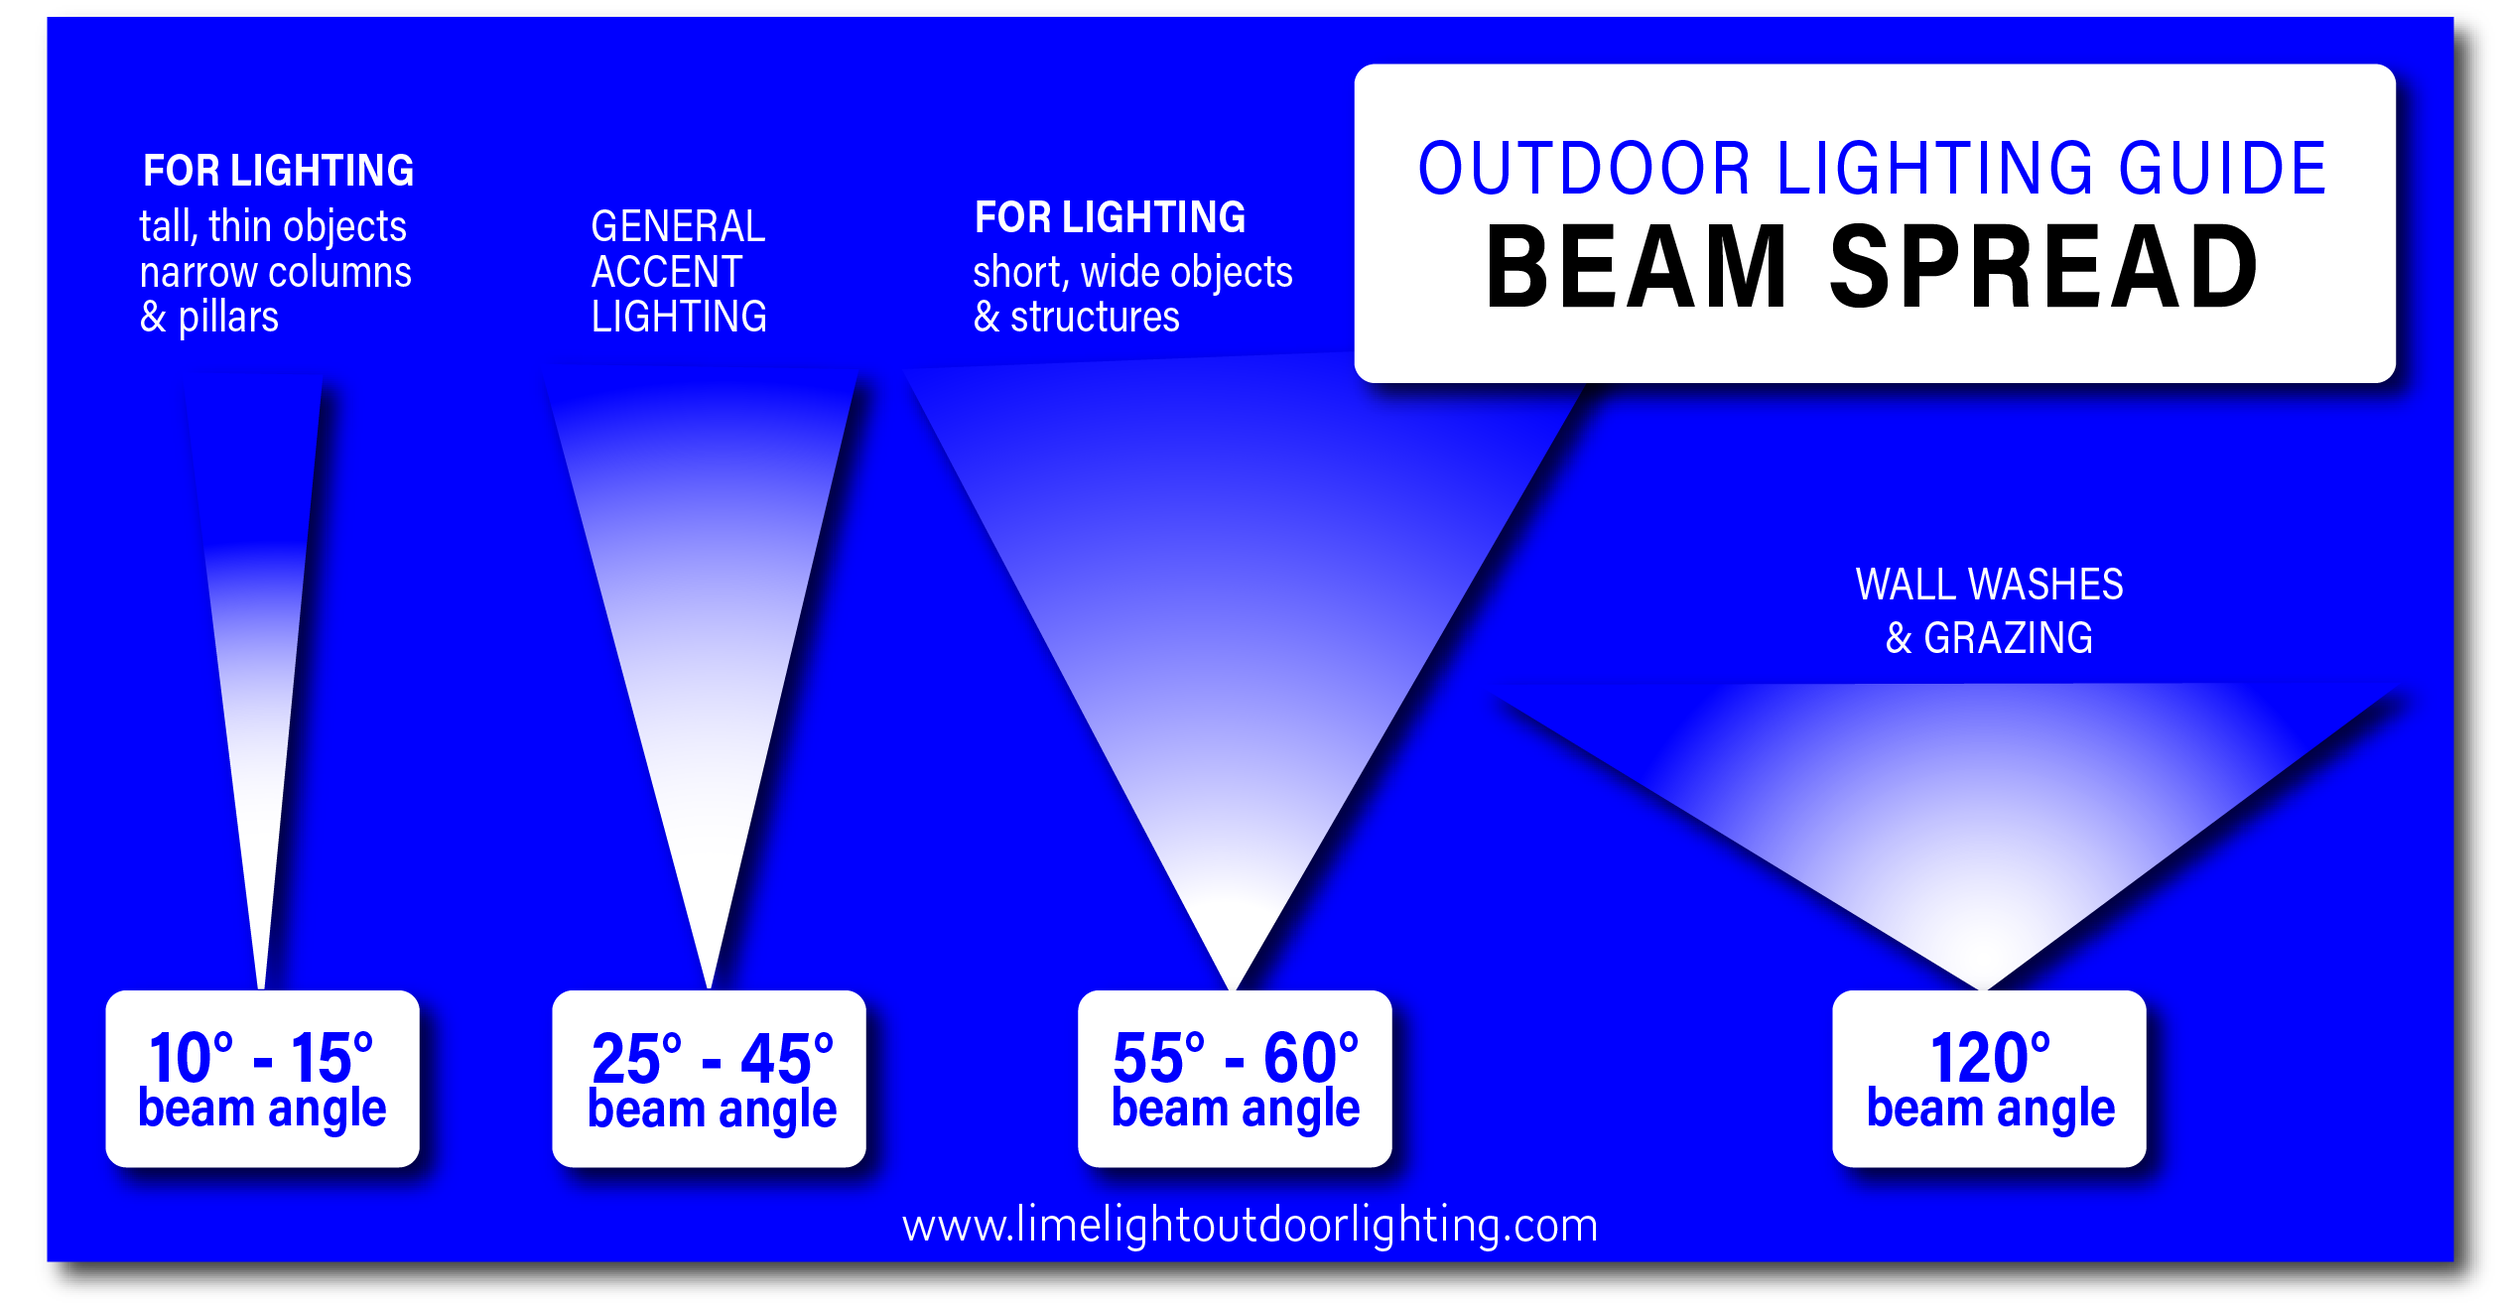
A kelvin (K) is the SI unit of measurement for thermodynamic temperature. Simply speaking, the kelvin measurement will tell you the “temperature” or COLOR of the light (warm vs. cool colored light). A lumen (ln) is the SI unit of measurement for luminous flux or the perceived power of a light (BRIGHTNESS). Beam spread or beam angle measures the spread of light (width of the beam) from a light source. (For more in-depth information about these measurements, check out this article.)
Now that you are familiar with the terminology, when selecting the type of lamps for your lighting project, you should always consider the application – just as you would when selecting the fixture.
For architectural lighting, we generally recommend a Kelvin temperature somewhere between 2700K and 3000K – this will depend on the color of the house itself as well as the homeowners’ preferences. When lighting trees, one could even go as high as 5700K depending on the type of tree, of course.


Lumen output and Beam angle will also vary and depend mostly on the height and width of the structure or tree that you are lighting. Always consider how far the light should reach and how bright it should be. For large two-story pillars or tall, narrow trees, lamps with more lumens and smaller beam angles would work well. However, for a single-story home or retaining walls, lamps with lower lumen output and a wider beam angle may be necessary.
The most common outdoor lighting lamp combination is 2700K, 40°, 250 ln (4W). While the Kelvin temperature should be consistent (at least for architectural lighting), using the same lamp in every fixture could create unsightly hotspots and/or dark spots.
Selecting the right lamps for an outdoor lighting project can be quite difficult but attention to detail will pay off in the final design. If you are hiring a lighting contractor, we recommend asking about these measurements. A good outdoor lighting designer will already be thinking about them and should be able to answer any questions you may have.
4. Not Lighting the Second Story of the House
Next time you’re driving through your neighborhood at night, slow down and notice the homes with architectural lighting. One of the most common outdoor lighting mistakes we see is homes lit from the bottom up with the light stopping at the first roofline. While a few uplights positioned at the base of a home will undoubtedly add some nighttime curb appeal, don’t forget the second story.
A well-trained outdoor lighting designer will always include lighting for the second story, gables, and/or dormers of a home. This ensures that the architectural charm of a home will carry from day to night.
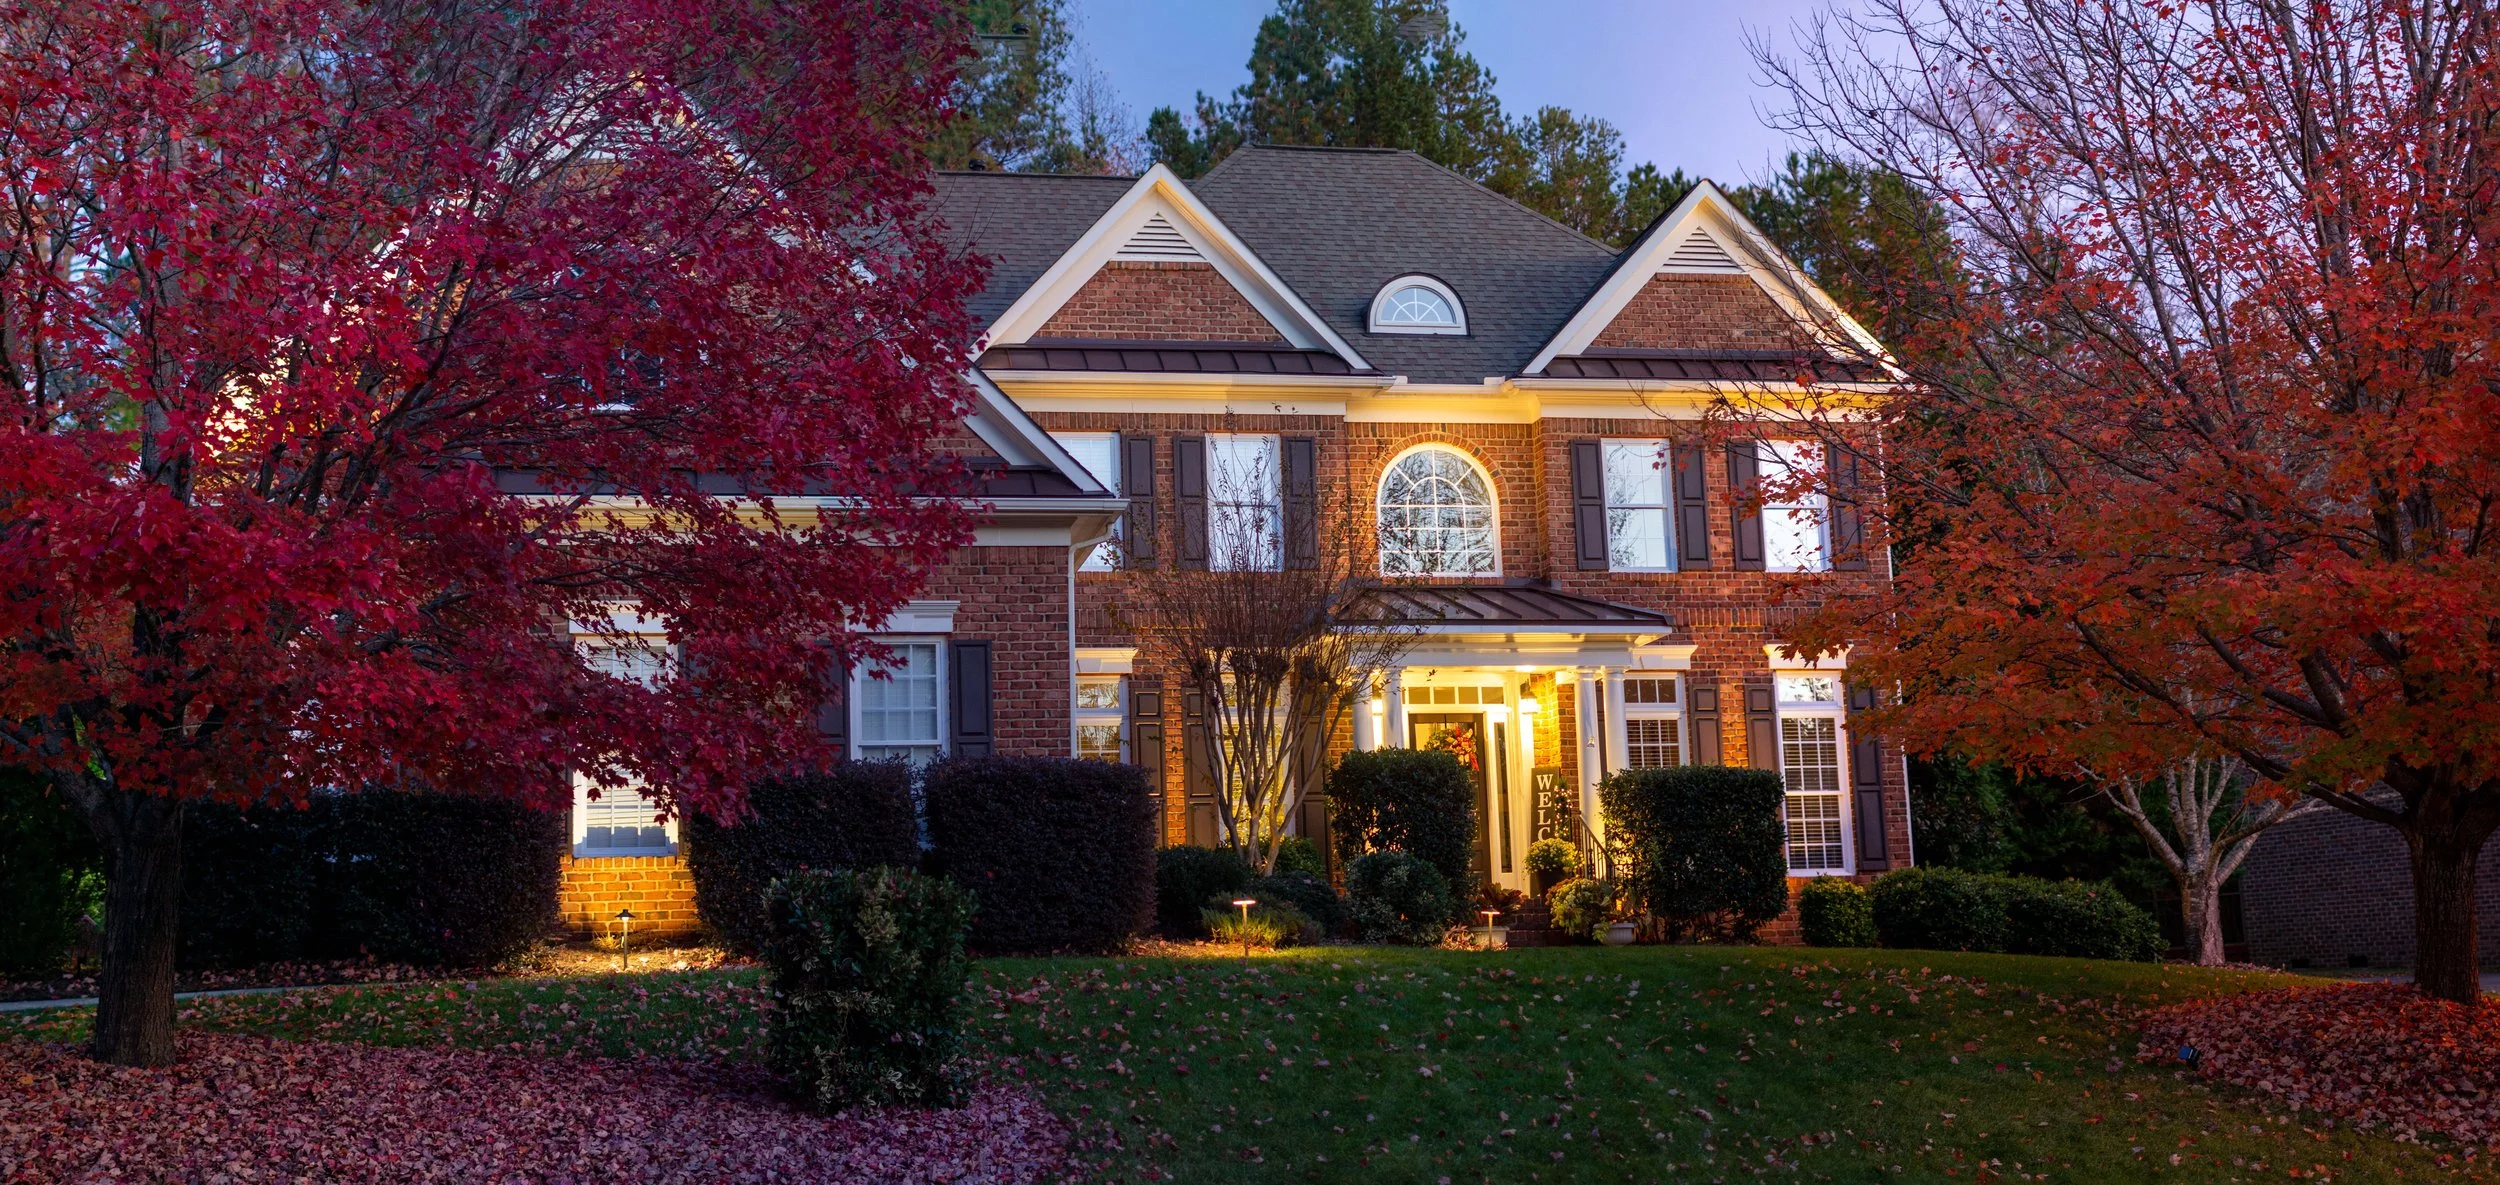
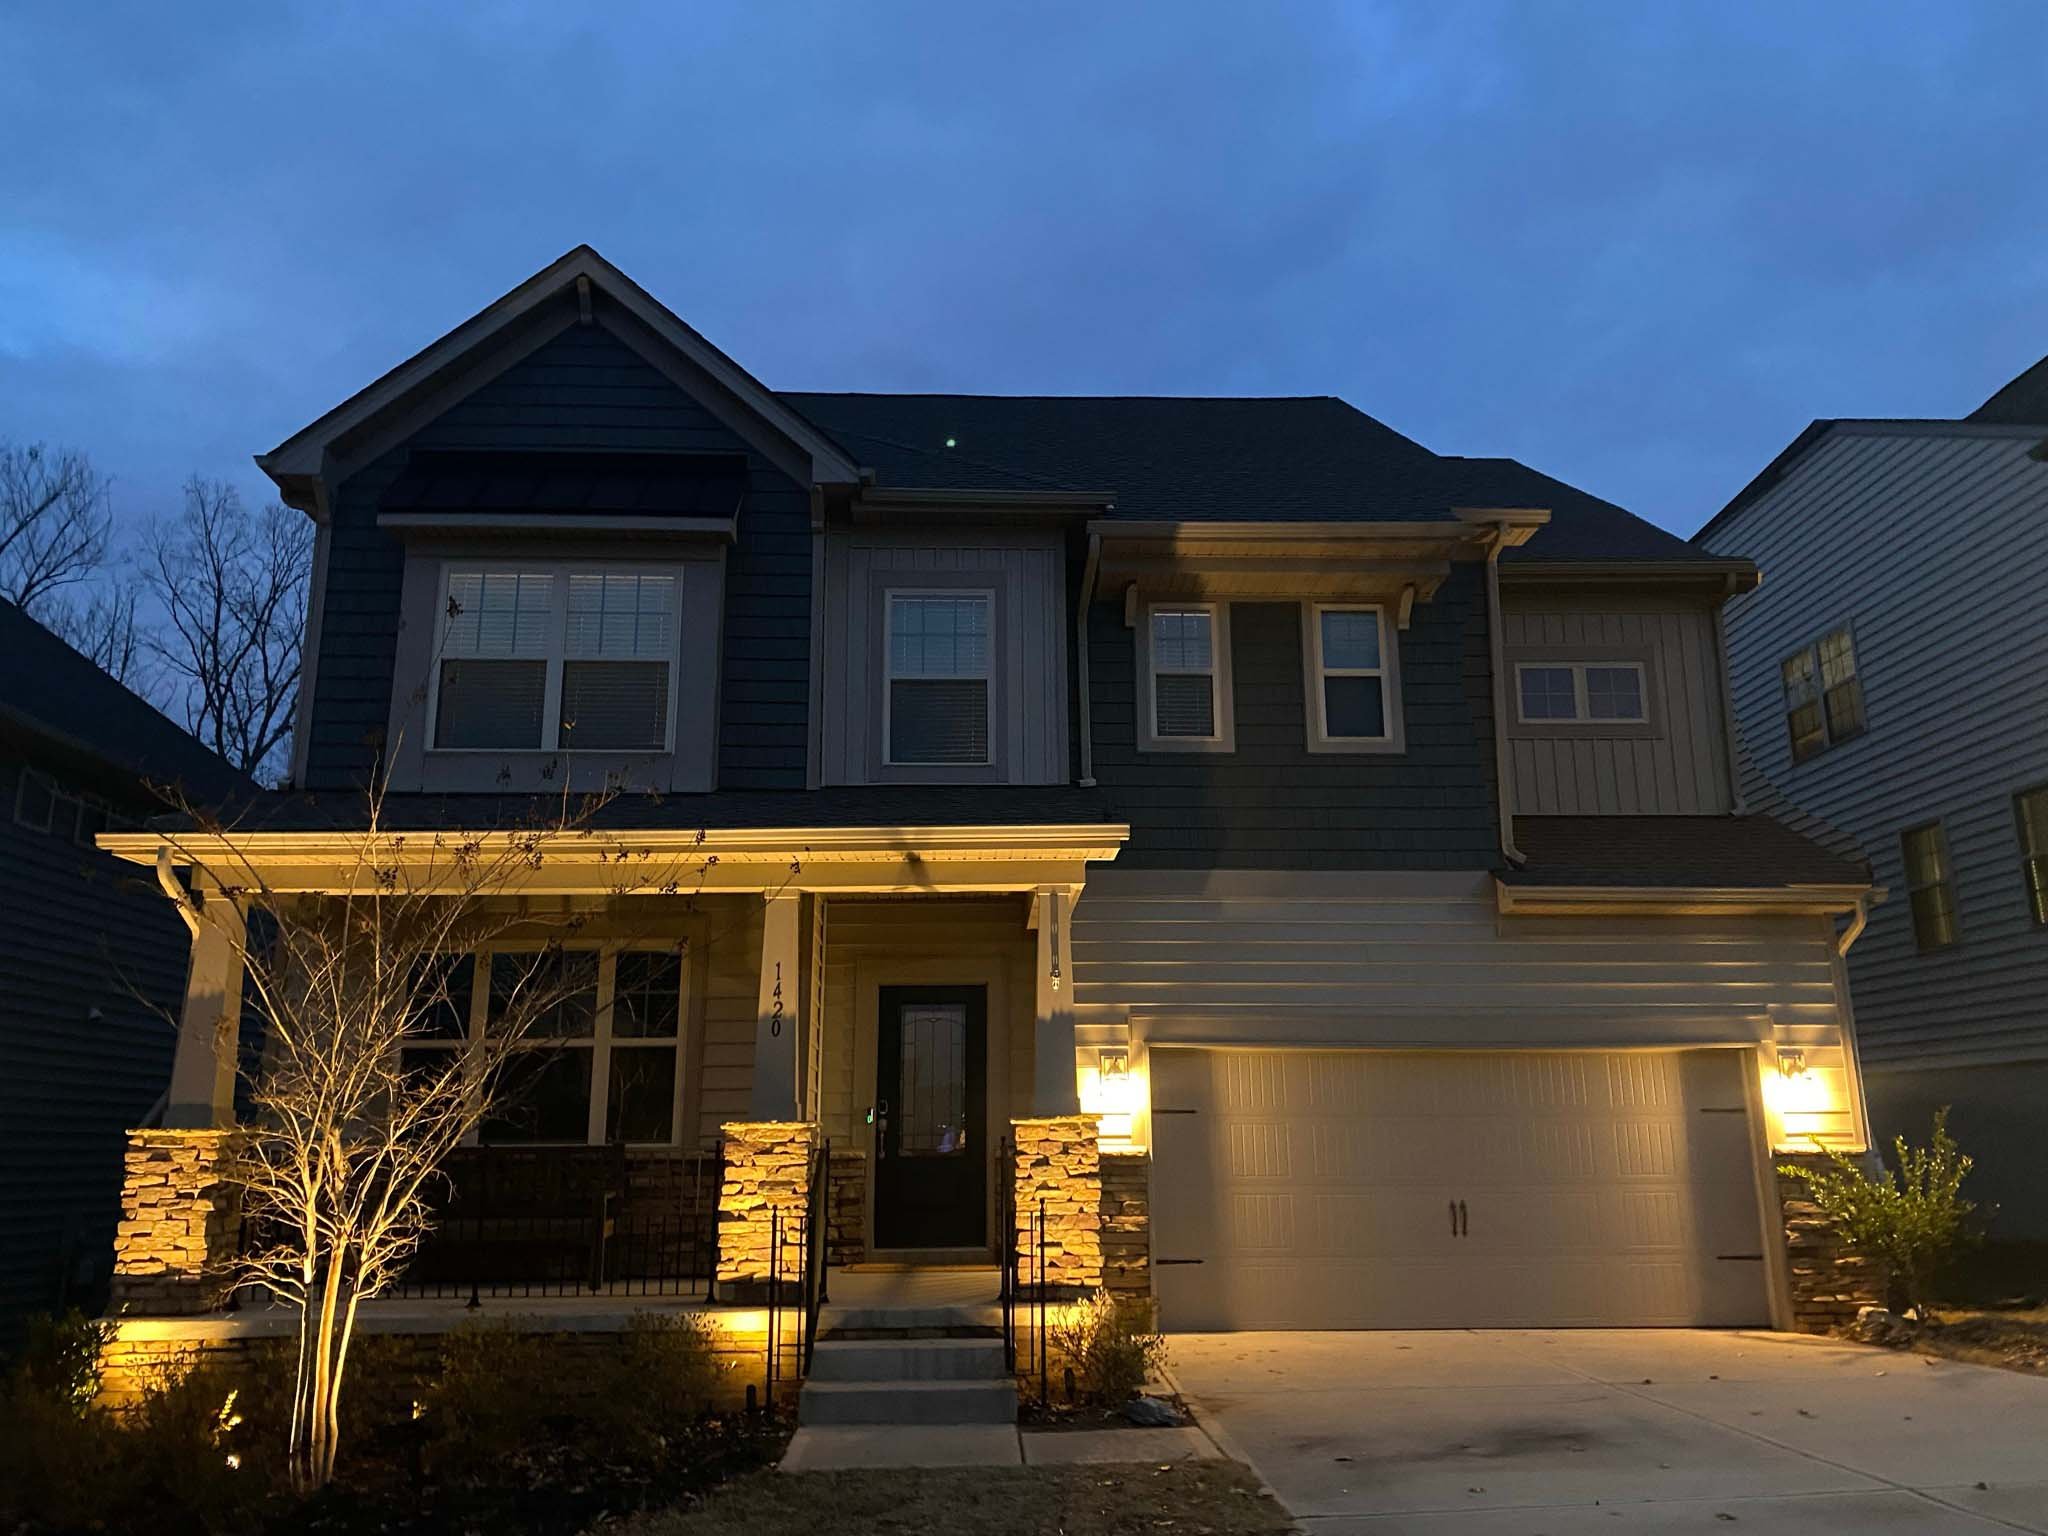
Take this home for example, notice how we installed smaller uplights in the peaks to make sure that the light carried from the base of the house up to the roofline. We also installed a small light above the entrance to avoid a dark shadow from the lights in front of the porch. This really accentuates the window above the porch as well.
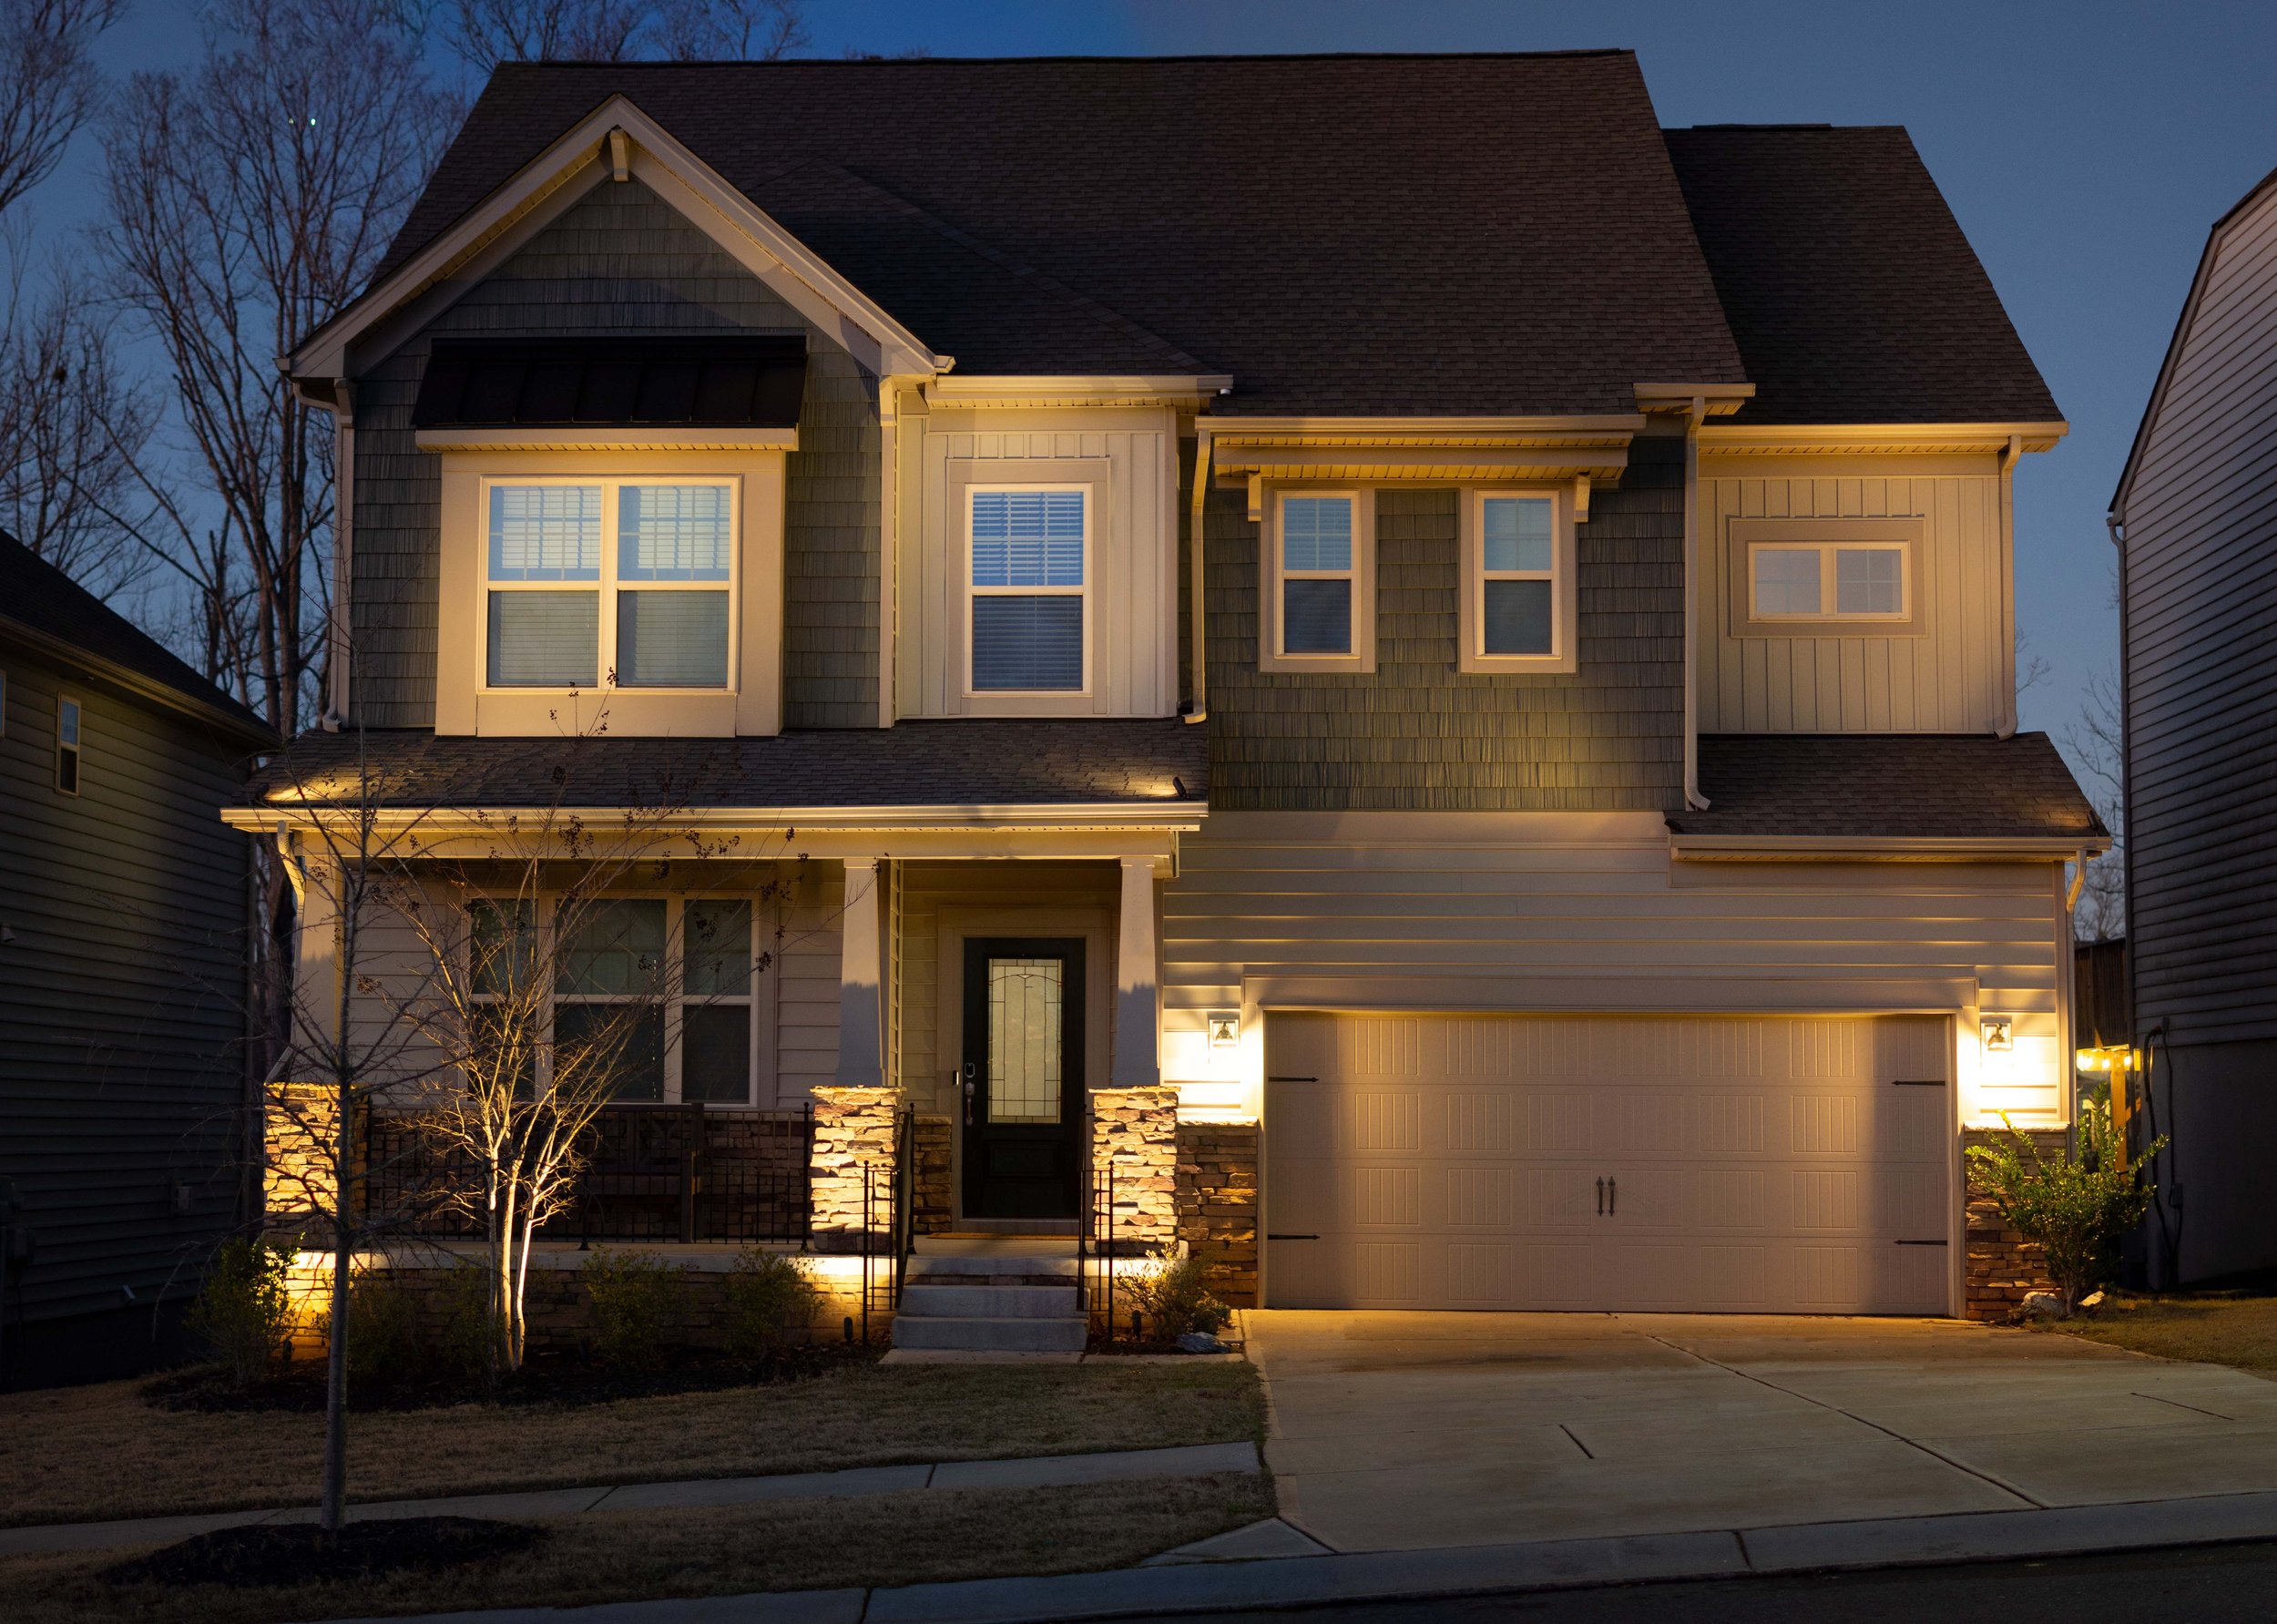
This series of photos perfectly illustrate the necessity of second story lighting. The first image shows the home with three uplights positioned on the ground shining up to the first roofline. Notice the harsh difference between the lit portions of the home and the dark second story. The second photo shows what the home looked like after we installed four additional gutter-mount uplights. In the second photo, the outdoor lights bathe the entire home in soft light accentuating the different architectural features of the home.
As lighting designers, we’ve seen it all! At a design consultation just last year, our client wanted second story lighting like his neighbor’s house. From a distance the neighbor’s house appeared well lit. However, upon further inspection, the neighbor’s second story lighting consisted of an aluminum spotlight fastened to the roof of the home with an extension cord hanging off the side of the house. If you are considering second story lighting, please research best practices. In this case, professionally installed LED lighting would have been the safest option.
5. Ignoring Outdoor Lighting Maintenance
While outdoor lighting systems can last a very long time, especially the newer LED systems, a certain amount of maintenance is required to ensure that the lighting system continues to function optimally. At Limelight, we offer complimentary maintenance for the first year after installing a new lighting system. During that time, we clean each fixture, make necessary adjustments to the fixtures, and cut back any plants that are blocking the light.
Simply adjusting fallen or tilted path lights and brushing the dirt/debris away from the lamp surfaces will keep your lighting system looking good. But making necessary adjustments to the placement of each fixture and maintaining the surrounding plants will keep your system looking good as NEW.
If you are going to DIY your landscape lighting, be sure to maintain it as well. If you are planning on hiring an outdoor lighting contractor, ask questions about maintenance. Set it and forget it just won’t do.
Outdoor Lighting Resources
If you are just starting your search for an outdoor lighting contractor, we’ve put together several resources to help you find the the perfect contractor for the job! Read about your options HERE as we help you navigate the task of interviewing and hiring the right contractor for the job. And don’t forget the consultation! Read all about lighting consultations HERE so you can be prepared to explain your lighting project and ask all the right questions.
Looking for an Outdoor Lighting Contractor in Charlotte, NC?
At Limelight, outdoor lighting is all we do. We offer design, installation, and maintenance services and would love to help you design a system that lets you make the most of your landscape — day and night.
We are a fully insured, family-owned company with a passion for well-designed outdoor lighting! Furthermore, we understand that client satisfaction is the key to our success, and we enjoy working with our clients throughout the process to deliver an outdoor lighting system that fits their vision and budget.
Getting started is simple.
Call Limelight Outdoor Lighting at (704) 285-1286 or follow the link below to get a FREE quote for your landscape lighting project.